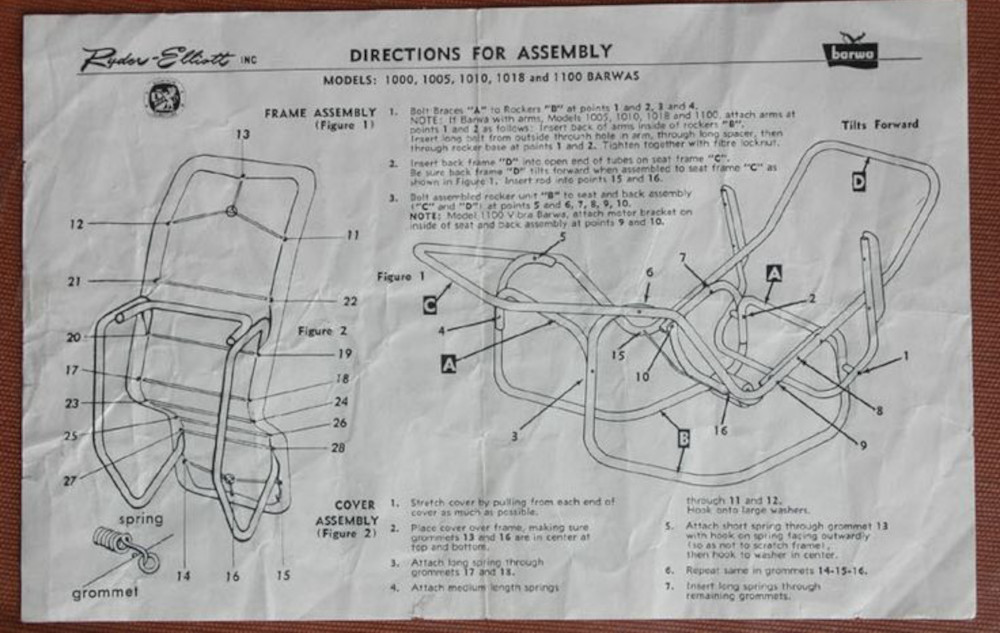
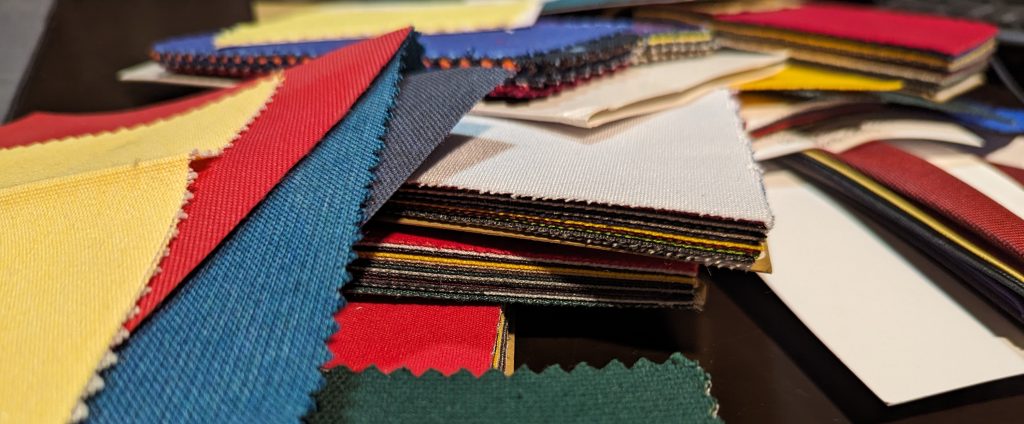
Posted on Leave a comment

Frame Types and Technical Details

This post is a work in progress, as there is much to more to unearth around these wonderful chairs. Please leave a comment or send us an email if you can help us fill in some of the gaps or help correct any mistakes.

Models

We can see from the assembly instructions that at the time, there were five models, 1000, 1005, 1010, 1018, & 1100. The text is difficult to read w/ this picture, but it’s clear that models 1005, 1010, 1018, & 1100 have arm rests and 1100 has another fixture close to where the spreader bar attaches in the middle of the frame. Thus, the 1000 is the standard chair w/o the added arm rests. At this point we aren’t sure if the same models numbers were used during the different iterations of the chair. We’ll do our best to document the examples we’ve seen.

Type ‘A’ Frames

Frames dating from the 50’s (possibly late 40’s?) use this form factor. These frames have thicker 1 1/4″ aluminum tubing and can be identified by the single ‘U’ shaped leg support in the back of the chair that is attached with four bolts. These frames are held together using ten  2 1/2″ bolts. These frames have held up very well with time, and if you are lucky enough to find one we recommend you buy it before someone else does.

Also, worth noting on this frame is the chair loop is attached using two wooden dowels. The ones in our frame measure 5.1″ by 1.1″ diameter. If you are restoring a chair definitely check these and replace is they show signs of rotting. Oak is a great choice for a replacement as it will last with outdoor use and hold up well to the elements. Commonly produced dowels with either be too thick (1 1/8″) or thin (1″). A larger 1 1/8″ dowel can be sanded down to fit with patience, or another great option is to find an appropriately sized broom handle and cut it to length. This tip was discovered by a member of the Bartolucci family! The dowels don’t need to fit tight, but you also don’t want a lot of play either.

Frame Type ‘B’

Chairs in the 60’s (maybe 70s?) commonly feature the thinner 1” aluminum tubing and have two of the leg supports in the front and back of the chair. The tube is contoured on the support, thus allowing for a shorter bolts, and there’s a single hole on each side. These frames are held together with six 2″ bolts and the leg supports use a shorter 1 1/4″ bolts. The wooden dowels are replaced by metal inserts on these chairs. These are also great frames to own.

Steel Frames?

Most Barwa frames are made of aluminum, but we’ve seen a number of chairs that were made of steel. If you see a frame that has rust on it, there’s a good chance it’s steel. An easy way to verify this is to see if a magnet will stick to it. It is possible to restore these frames, but depending on the condition it will likely take more effort than aluminum. It is usually possible to sand through the rust in most scenarios, but it takes a lot of elbow grease. Depending on the look you’re after, it may be best to find someone who can sandblast and powder coat the frame. Another alternative is to paint the frame using Rust-Oleum

Spreader Bars

The spreader bar performs two functions. First, it prevents the frame from narrowing due to spring tension. Second, it keeps the chain or cable used to reinforce the cover/grommets from showing through the front of the cover. Often times photos of Barwas with perfectly smooth covers have a spreader bar on the frame. The thinner aluminum on the ‘B’ frames can flex under spring tension and give the chair a slight hourglass shape. Corded covers without springs are a great option for ‘B’ frames that don’t have this bar. As far as we can tell springs work perfectly fine on these chairs and the hourglass effect is subtle and only affects the aesthetics. The spreader bars are nice to have, but the chair is just as functional without one.

Arm Rests

The arm rests for these chairs is a simple, elegant single piece of aluminum with a plastic covering that can swing in two positions. These attach on the rear leg brace using 1 1/4 inch spacer bar. We haven’t tried these, but this looks like the correct replacement. These should be attached using stainless steel 18-8, 1/4″-20 x 3-1/2″ with a slotted round head and secured with matching nylon insert lock nuts. As seen in the pictures above, the plastic doesn’t seem to have held up well. We don’t currently have a replacement option for these.

Covers

Original covers are easy to spot as they will have a tag with the original logo and you should be able to feel the chain links by the grommets through the canvas. Some of the earlier versions offered a padded cover that would sit on top of the canvas cover and enclose the springs.

This is the label from my grandmother’s chair. …..it’s seen better days

Christie Covers seems to have made the majority of replacement covers. I believe they made the covers that were sold through D&J Patio in Arizona. They made excellent replacement covers that were true to the original and improved on the chain concept by using a metal cable. If you see a barwa chair and the cover doesn’t have a tag on it, there’s a pretty good chance it’s one of these.

barwachair.com covers, AKA the ones we make! Amanda and I spent almost six months making numerous prototypes. We went through twenty something different patterns and I can’t even remember how many fabric types we looked at. Our covers take inspiration from both the original covers and Christie’s. Probably the main difference with our covers is that they are meant to fit in one direction on the chair, due to the contours we added for improved fit.

Barwa Rocking Chairs

We don’t have much details about these, but the Barwa design was adapted to a rocking chair.

…and yes we made a new cover for this one.

More to come!